Use PowerShell to View BitLocker Encryption Status

Using BitLocker to encrypt hard drive can take a while to complete, so it runs as a background process. While the drive is being encrypted, you can click on a tray icon to monitor the progress.

However, if you restart or shut down the computer during encryption, after the Windows starts up again BitLocker tray icon may not appear, which means that you can’t monitor the encryption progress.

To work around this issue, you can view the encryption status via PowerShell. Open PowerShell (you may need to run it as administrator), and type the following command –

manage-bde -status

This will display encryption status, along with percentage encrypted –

PS C:\windows\system32> manage-bde -status c:
BitLocker Drive Encryption: Configuration Tool version 10.0.10011
Copyright (C) 2013 Microsoft Corporation. All rights reserved.

Volume C: [Windows]
[OS Volume]

    Size:                 237.72 GB
    BitLocker Version:    2.0
    Conversion Status:    Decrytpion in Progress
    Percentage Encrypted: 7.2%
    Encryption Method:    AES 128
    Protection Status:    Protection Off
    Lock Status:          Unlocked
    Identification Field: Unknown
    Key Protectors:
        Numerical Password
        TPM And PIN
How to restart stuck Windows 10 Update downloads

In some cases, Windows 10 Updates can get stuck while downloading – the download will get to a certain percentage and will not progress further. You can try and run Windows 10 Update Troubleshooter, but it won’t always resolve the issue.

To resolve stuck downloads manually, do the following:

Stop Windows Update service – open command prompt and run the following command

net stop wuauserv

Then open Windows Explorer and navigate to

C:\Windows\SoftwareDistribution

This is where Windows Update stores downloaded files before installing updates.

Delete everything from that folder.

Go back to command prompt and start the Windows Update service by running the following command

net start wuauserv

Go to Setting and then go to Updates and click on Check for Updates button. Any updates that were not installed will start downloading from the beginning (0%). This time the download should finish without issues.

How to Speed up Windows Folder Loading

Sometimes there is one (or more) folders on your PC that take a very long time to load and display contents when you try to open them. This is due to the fact that Windows will try to figure out what type of content is mostly present in that folder to optimize the folder view (e.g. Pictures, Music, etc.).

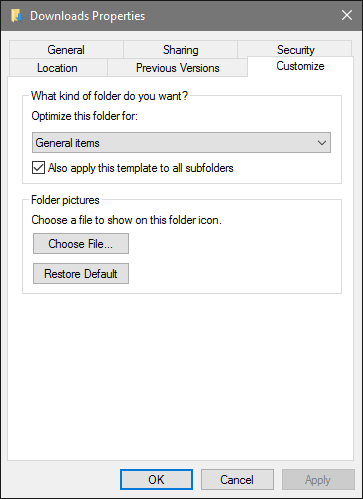
You can stop this behavior by changing the folder’s content type in Properties. Right-click on folder and select Properties, then go to Customize tab. Select General Items from “Optimize this folder for” drop down list. You can also select “Apply this template to all subfolders” if you have subfolders inside with the same issue. Click Apply to apply changes, and then OK to close Properties dialog.

Change should take place immediately next time you open up that folder.

Windows fast folder load

Windows 10 thrashing your hard drive? Turn off scheduled drive optimization

One thing that many people (including myself) have noticed is that hard drive usage in Windows 10 often jumps to 100% and stays there for a while.

One of the reasons for this is automated drive optimization, which runs defrag on schedule. Chances are that you don’t need this, or don’t needed it as frequent. You can either disable scheduled optimization, or change the schedule.

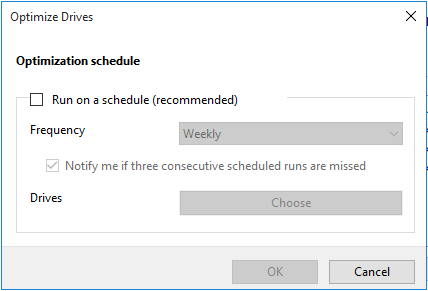
Tap Search and search search for “defrag”. Select Defragment and Optimize Drives desktop app from search results. When the app opens, click on Turn Off under “Scheduled optimization” section. A new window with options will pop up – you can either disable optimization, or change the frequency so that it runs less often.

OptimizeDrives

This should solve your problem with hard disk thrashing under Windows 10. If you are still having the issue, culprit could be one of third party services or background applications that are running on your PC.

How to disable lock screen in Windows 10

If you would rather have login screen displayed on Windows 10 boot instead of lock screen, you can change a registry setting to disable lock screen.

Open Regedit and navigate to

HKEY_LOCAL_MACHINE\SOFTWARE\Policies\Microsoft\Windows\Personalization

Note: if you don’t see Personalization key, just create it.

Inside Personalisation key create new DWORD value called NoLockScreen. Edit NoLockScreen and set value to 1 do disable lock screen. If you wish to enable it again, just change the value to 0 or delete NoLockScreen DWORD.

Windows 10 Technical Preview

Few days ago Microsoft has released Windows 10 Technical Preview. You can get it for free after you sign up for Windows Insider Program.

Once you have signed up and downloaded installer ISO file, you can install Windows 10 TP on a PC, or as a virtual machine. I got my hands on it today, and installed it under VirtualBox.

Here are a few screenshots of the installation process and Windows 10 UI.

Windows Update Troubleshooter automatically fixes issues with Windows Update

Windows Update Troubleshooter is a handy tool from Microsoft which diagnoses and fixes issues with Windows Updates. If you’ve come across an update which keeps failing to install, give this tool a go. I’ve used it successfully on one of my PCs that is running Windows 8.1.

If you just want to scan for problems instead of automatically fixing them, go to advanced options (link found on first screen), and deselect “Apply repairs automatically”.

Windows Update Troubleshooter is free, and you can download it directly from Microsoft.

How to change lock screen image in Windows 8.1

If you wish to change lock screen image in Windows 8.1 (this should work with Windows 8 as well), follow these steps –

On start screen, search for GPEDIT.MSC to open Local Group Policy Editor.

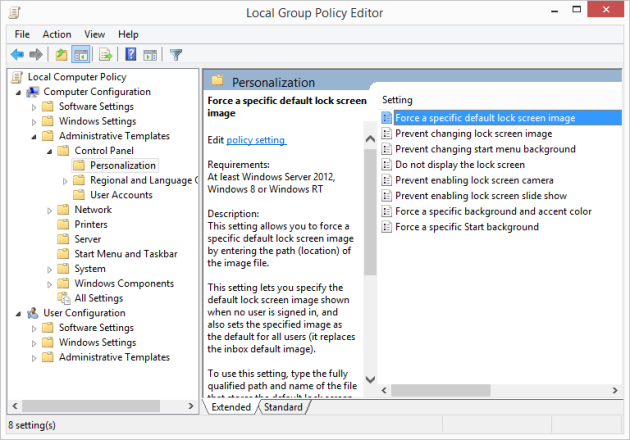
Go to Computer Configuration\Administrative Templates\Control Panel\Personalization and open setting “Force a specific default lock screen image”.

LockScreenSettings MSC

Select “Enable” option and enter path to the image file to display on lock screen.

LockScreenSettings

Click on Apply to apply the changes. Next time you restart your computer, lock screen will display new image.

How to enable Secure Sign-in (Ctrl+Alt+Del) in Windows 8 and 8.1

Enabling secure sign-in in Windows 8 and 8.1 will require users to press Ctrl+Alt+Del to get to login screen.

To enable secure sign-in, search for “netplwiz” from start screen.

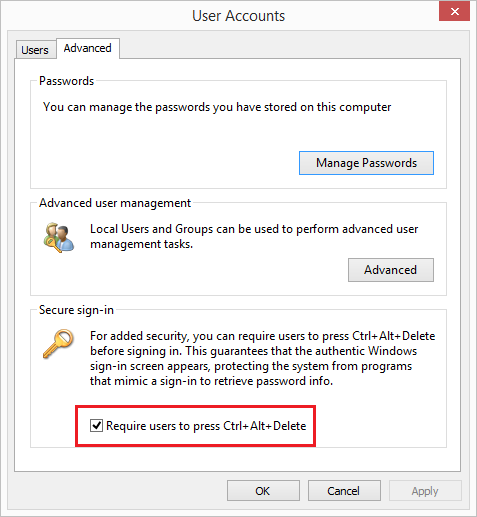
When User Accounts screen opens, click on Advanced tab. Under Secure sign-in section, check “Require users to press Ctrl+Alt+Delete” option.

Click OK to close User Accounts screen. Next time you are logging into your computer, you will be prompted to press Ctrl+Alt+Del first.

Win8 CtrlAltDel

Task Scheduler failed to start – Error Value: 2147943645

I had set up a couple of task scheduler jobs on a server to restart couple of services.
After checking on those jobs the next morning, I saw that both of them failed with error message –

Task Scheduler failed to start “\xyz” task for user “Domain\MyUserName”. Additional Data: Error Value: 2147943645.

I kicked off both jobs manually and they ran fine. After having another look at the setup, it turned out I forgot to set the option to run the jobs even if user account under which the jobs run is not logged in. After changing this setting everything worked fine.

Task Scheduler