How to Hard Reset HP Laptop

Doing a Hard Reset (or Forced Reset) on HP laptop to clear and then set up again connections between BIOS and the hardware. You can use this to resolve a range of issues, such as boot issues, Windows not loading properly, or software freezing when you use it.

To do a hard reset, perform the following steps:

  1. Turn off you laptop.
  2. Disconnect power and anything else you might have connected (e.g. printer, USB hard drive, mouse).
  3. Remove the battery.
  4. Press and hold Power button for 30 seconds.

Once you’ve done all this, re-insert the battery and power up your laptop.

How to fix no sound over HDMI on Raspberry Pi

Some TVs / monitors won’t play sound over HDMI when using Raspberry Pi, even if sound from other devices plays fine.

First thing to do is to change the setting to force sound over HDMI using configuration tool. Start configuration tool from terminal by typing

sudo raspi-config

Select option 8 (Advanced Options) from the menu and then select Audio option. Select option to force audio over HDMI and exit configuration tool. You should now have sound over HDMI.

If method above still didn’t help, you’ll need to edit configuration file manually. Go to terminal and navigate to /boot directory. Then edit config.txt file by typing

sudo pico config.txt

Find a line with

hdmi_drive=2

and uncomment it (remove # in front). Reboot Raspberry Pi and you should have HDMI sound.

How to boot GPS device directly into Windows CE

Recently I was given a GPS device which runs Windows CE 6.0. After the unit boots, custom GPS software is loaded automatically. The software itself is very clunky, but it does let you go into the Windows CE desktop.

Since I use Google Maps on my iPhone for all my GPS needs, I decided to try an hack the device so that it boots directly into Windows CE, and turn it into Win CE tablet in the process. Turned out all I had to do is change a registry setting.

To access registry on Win CE device, you’ll need CeRegEditor, which is a free application. After you’ve downloaded and installed it, connect your device to your PC. Open CeRegEditor and connect to the device.

Once connected, browse to HKEY_LOCAL_MACHINE\init. In here you will see several Launch keys (10, 20, 30, etc.). One of those keys will contain the name of the GPS software .exe file, which will depend on your device. In my case it was Launch50. Edit the key and change value to Explorer.exe. Save changes and reboot your device – it will boot straight into Windows CE.

CERegEditor

OS X – Create Time Capsule with VirtualBox

As you probably already know, Time Capsule is Apple’s wireless backup device. Using Time Machine on OS X, you can set up your Mac to back up itself automatically to Time Capsule. Once your files are backed up to Time Capsule, you can browse the backups, do restores, and look at and restore file versions from specific point in time.

This is a very neat and easy to use solution for Mac backups, however Time Capsule is not cheap, with prices starting from 349 AUD. However, you can set up one for free inside a virtual machine using VirtualBox. All you need is a spare PC on which to set up the virtual machine.

Guys at SmallNetBuilder have written an excellent step by step guide on how to setup the VM. If you don’t feel like creating everything from scratch yourself, they also provide a download of a virtual appliance, with everything already setup.

I’ve been using this home brew Time Capsule for some time now, and it works great. Now there are no excuses not to backup your Mac.

VirtualBox bridged networking not working on OS X Mavericks

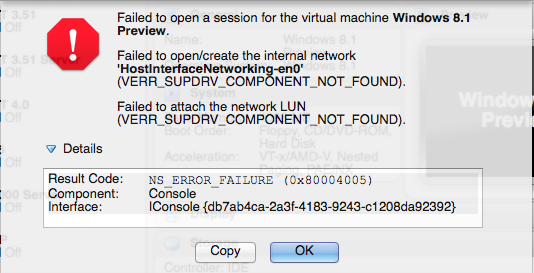
If you tried running a VirtualBox VM that uses bridged networking after uprgrading your Mac to OS X Mavericks, you would get an error “Failed to open/create the internal network ‘HostInterfaceNetworking-en0’.

VirtualBox bridged network error in OS X Mavericks

To resolve the issue, download and install the latest version of VirtualBox, which at the time of writing this article is 4.3.0. As reported by some other VirtualBox users, if you already running version 4.3.0 and still see the same error, reinstall VirtualBox.

You can download VirtualBox here.

How to increase disk size in VirtualBox

If you need to increase disk size of a virtual machine setup in VirtualBox, you can use VBoxManage command line tool to do this.

VBoxManage modifyhd HardDisk.vdi --resize 51200

Command above would resize the disk to 50GB – resize parameter is in megabytes.

After resizing, you’ll need to boot into the host OS and either resize the primary partition or create a new partition in order to be able to use newly added disk space.

Windows 2.03 on Amstrad PPC640

I’ve been feeling retro all weekend, and one of the things I’ve done is to install Windows 2.03 on my Amstrad PPC640. I’ve already written a post on my PPC640, which you can read here. Quick summary of the PPC640 – 16 bit 8086 compatible CPU running on 8MHz, 640KB RAM and a monochrome 9″ LCD display.

Why Windows 2? Well Amstrad only has 2 720KB floppy drives, and Windows 2 is the last version of Windows that can be installed onto floppies – no hard drive required. It installs itself on 2 720KB floppies, which gives you the bare bones Windows 2.03 environment. A third floppy gives you a bunch of Windows applications, some of which you still get with new versions of Windows (modern versions of course).

Applications that you get are:
– CALC.EXE – Calculator
– CALENDAR.EXE – Calendar application
– CARDFILE.EXE – Personal database
– CLOCK.EXE – Clock
– NOTEPAD.EXE – Notepad
– PAINT.EXE – Paint
– REVERSI.EXE – Reversi game (no Minesweeper or Solitaire in those days)
– TERMINAL.EXE – Terminal emulator application
– WRITE.EXE – Windows Write word processor

There are also a few other system utilities, like spooler, pif editor, image converter and configuration utility. Amazing what you could fit on a single 720KB floppy in those days.

Windows 2.03 takes 238KB of memory when loaded, which leaves a whole 402KB free to run applications (as you can see on one of the screenshots). It was enough to run multiple apps at the same time, though.

Here are a few screenshots of the system up and running.

iPad Camera Connection Kit

20121218-153020.jpg

iPad Camera Connection Kit

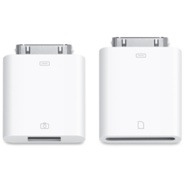
iPad camera connection kit allows you to import photos from your digital camera / iPhone to your iPad. It comes with two connectors – one for USB cable which allows you to plug in your camera directly, and one for SD cards.

Using connection kit is pretty straight forward. Attach one of the connectors to you iPad, and then attach USB cable or insert SD card. Once connected, Photos app will open and display photos on connected camera / SD card. You can then import all photos or choose individual ones to import. Once photos are imported, you can either keep them on the source, or delete them from the source camera / SD card.

The kit supports standard photo formats, including JPEG and RAW, along with SD and HD video formats.

How to format floppy disk to 720K in Windows

Microsoft has officially removed support for formatting floppies to 720K since Windows XP. For majority of people floppies (especially 720K ones) have long been a thing of the past. However, if you do find yourself in a situation where you need a floppy to be formatted to 720K, you can still do it through command line.

Open command line (Start -> Run -> cmd), insert a floppy, and enter the following in command line:

FORMAT A: /T:80 /N:9

This will format your floppy to 720K. Couple of things to be aware – first, in order to be able to format floppy disk to 720K, you need to cover the hole in lower right corner (you can use masking tape), and second, if you are using a USB floppy drive, this might not work due to most USB floppy drives not supporting reading / writing 720K format.

Amstrad PPC640

Recently I acquired an Amstrad PPC640. It is a PC compatible portable computer, built in 1988. It has an LCD screen, but it doesn’t open like today’s laptops. Keyboard flips off the cover, and the LCD screen is then raised from inside. It comes with MS-DOS 3.3 and Amstrad’s Organizer software package, which includes card file, calculator, diary and phone dialer.

Specifications:

  • CPU – NEC V30 at 8MHz
  • RAM – 640KB
  • ROM – 16KB
  • Screen – 9″ LCD
  • Sound – Beeper
  • Weight – 6kg
  • Power Supply – 10 C Cell Batteries
  • Drives – 2 720KB Floppy Drives
  • Comms – Modem

More information at:
Old-computers.com
Wikipedia